Buying Guides
How to Put On a Spare Tire Cover Correctly (7 Steps, No Tools Needed)
May
Knowing how to put on a spare tire cover correctly is simpler than most buyers expect — but doing it wrong leads to covers that flap at highway speeds, block your backup camera, or wear out far sooner than they should. The good news: once you know the right technique, putting on a spare tire cover takes under five minutes with no tools required.
This guide walks you through exactly how to put on a spare tire cover in 7 steps, covers the most common mistakes first-time installers make, and shows you how to confirm a correct installation before you pull out of the driveway. Whether this is your first time or your fifth, the technique for how to put on a spare tire cover correctly is the same.
Jump to what you need:
- What You Need First
- 7 Steps to Put On a Spare Tire Cover
- How Long Does It Take?
- Common Mistakes to Avoid
- How to Take Off a Spare Tire Cover
- Frequently Asked Questions
How to Put On a Spare Tire Cover: What You Need First
Before learning how to put on a spare tire cover, confirm these three things — they determine whether your installation will succeed or fail from the start.
Correct Cover Size
A cover that is one inch too small will not go on properly. A cover that is two inches too large will not stay put during driving. Spare tire covers are sized by the overall diameter of the tire, not the wheel. If you have not confirmed your tire diameter, measure it now before installing — getting this right is more important than any installation technique.
→ Not sure about your size? See: How to Choose the Right Spare Tire Cover Size
Correct Camera Hole Option
If your vehicle has a rear-mounted backup camera positioned through the spare tire, you need a cover with a camera hole. Installing a cover without this opening will block the camera entirely. Check the center of your spare tire before installing — if you see a small lens there, your cover needs a camera hole.
→ Need help? See: Spare Tire Cover Camera Hole Guide
Check Tire Pressure Before Installing
A flat or underinflated spare tire is smaller in diameter than it is when properly inflated. A cover installed on a deflated tire may appear to fit correctly but will be too tight once the tire is brought to proper pressure. Always check tire pressure before putting on the cover.
| # | Check | Why It Matters | How to Verify |
|---|---|---|---|
| 1 | Correct size | Wrong size = won’t fit or looks sloppy | Read sidewall code + match to size chart |
| 2 | Camera hole option | Wrong option = blocked camera or unnecessary hole | Check if backup camera is on spare tire |
| 3 | Tire is inflated | Flat tire = cover fits incorrectly | Check tire pressure before installing |
How to Put On a Spare Tire Cover: 7 Steps (No Tools Required)
No tools required. The entire process takes 3–5 minutes for first-time installation and under 2 minutes once you have done it before.
Step 1 — Clean the Spare Tire First
Wipe the face of the tire with a damp cloth to remove dust, dried mud, and surface grit. This step takes about two minutes and serves two purposes: it prevents trapped debris from abrading the inside of the cover over time, and it gives you a clean surface to inspect for any damage before covering it.
If the tire has been sitting outdoors for an extended period, this step is especially worthwhile. A clean surface also makes alignment easier because you can see the tire edges clearly.
Step 2 — Orient the Cover Correctly
Hold the cover face-outward — design facing away from the vehicle — and locate the drawcord opening on the back. This opening should face toward the vehicle when the cover is installed.
If your cover has a camera hole: Identify where it is positioned before you begin pulling the cover over the tire. On most covers, the camera hole is centered. Locate your backup camera lens on the tire so you know where to aim the hole during installation.
Step 3 — Start at the 12 O’Clock Position
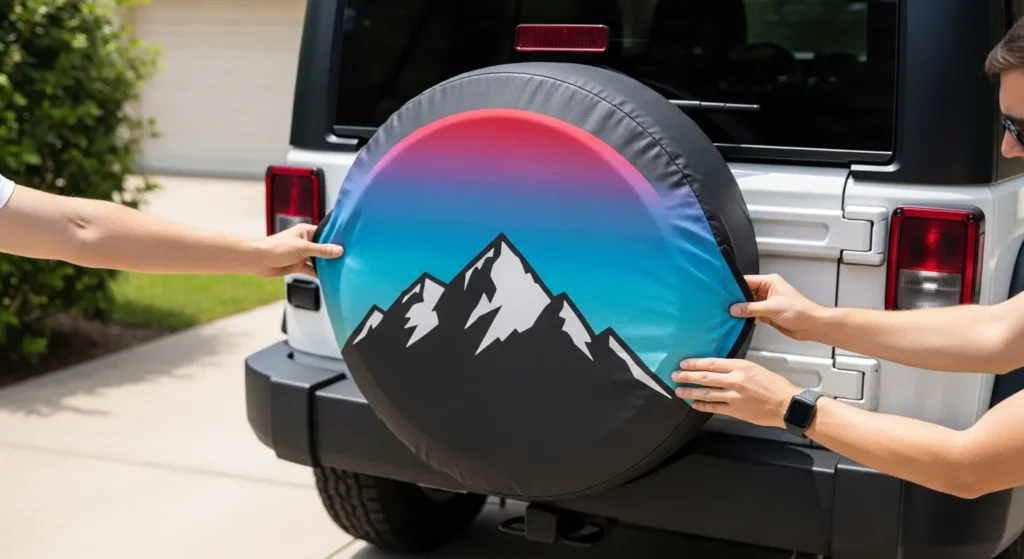
Position the top edge of the cover at the 12 o’clock position of the tire — the highest point. Pull the cover down and over the tire in one smooth, even motion, working from top to bottom like pulling a knit cap onto a head.
Keep the cover centered as you pull it down. If you pull from only one side, the cover will rotate and sit off-center, making the rest of the installation more difficult. Work both hands evenly down the sides of the tire simultaneously.
Step 4 — Guide the Camera Hole Into Position
If your cover has a camera hole, pause before pulling the bottom edge fully over the tire. Hold the cover in place and check that the hole aligns with the lens on the tire. The hole should sit centered over the camera with the lens clearly visible through the opening.
If the alignment is off, adjust the cover position now — rotating it slightly left or right until the hole and lens are aligned. Do this before tightening the drawcord. Adjusting alignment after the drawcord is tightened is much more difficult.
Step 5 — Pull the Bottom Edge Over the Tire
Once the cover is roughly positioned and — if applicable — the camera hole is aligned, pull the bottom edge of the cover down and around the lower circumference of the tire. Work around the bottom evenly so the fabric sits uniformly without bunching on one side.
The cover should now be fully over the tire with the drawcord opening accessible at the back.
Step 6 — Tighten the Drawcord Firmly
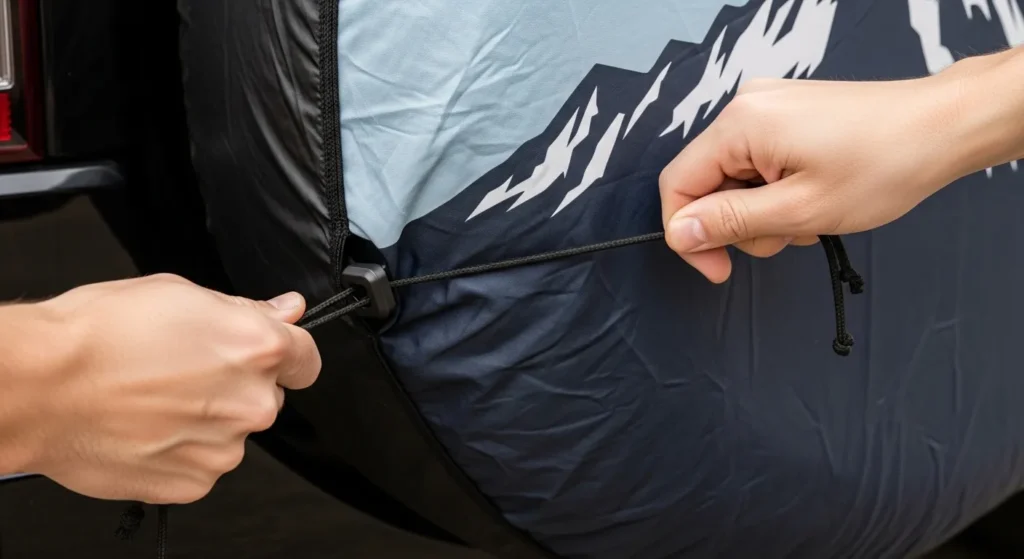
Pull the drawcord firmly until the cover fits snugly against the back of the tire. The cover should feel taut — no loose or floppy sections anywhere on the face. Pull both ends of the drawcord evenly so the closure gathers uniformly rather than pulling tighter on one side.
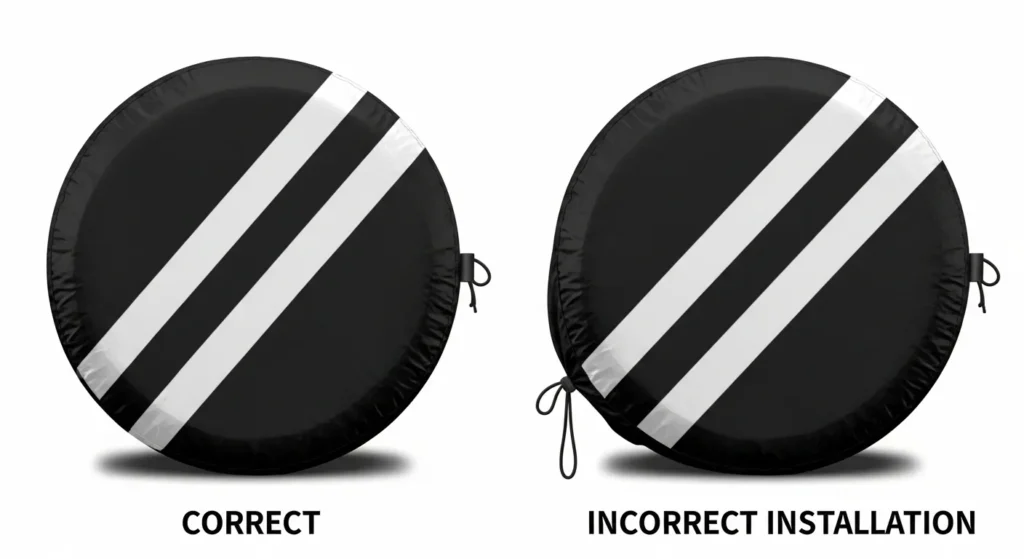
Tie or knot the drawcord ends securely once the cover is tight. Tucking them in or securing them against the tire prevents the loose ends from rattling during driving or loosening over time.
This is the most critical step when putting on a spare tire cover. A loose drawcord is the most common reason covers flap at highway speeds or slide out of position over time. Pull it tighter than feels necessary — it will not damage the cover.
Step 7 — Final Inspection Before Driving
Step back and check the cover from a distance before driving:
- Design is centered and facing the correct direction ✓
- No visible wrinkles, bunching, or loose sections ✓
- Bottom edge sits evenly around the lower circumference of the tire ✓
- Camera hole (if applicable) aligns with the lens — activate your reverse camera to confirm ✓
- Drawcord is tight and the ends are secured ✓
If any of these checks fail, loosen the drawcord, adjust the cover position, and re-tighten. You have successfully put on your spare tire cover once all five checks pass.
How Long Does It Take to Put On a Spare Tire Cover?
| Situation | Time |
|---|---|
| First time, including tire cleaning | 5–7 minutes |
| First time, no cleaning | 3–5 minutes |
| Once familiar with the process | Under 2 minutes |
| Emergency roadside removal | Under 60 seconds |
5 Mistakes to Avoid When Putting On a Spare Tire Cover
Mistake 1 — Pulling the Cover From One Side Only
Pulling the cover down from only one side causes it to rotate off-center during installation. The cover ends up misaligned, the design faces at an angle, and the drawcord closure sits unevenly. Always use both hands and pull down both sides of the cover simultaneously.
Mistake 2 — Tightening the Drawcord Before Aligning the Camera Hole
If you pull the drawcord tight before confirming camera hole alignment, you lock the cover in whatever position it happens to be in — and adjusting it afterward requires loosening everything and starting over. Always check camera alignment before tightening the drawcord.
Mistake 3 — Putting On a Cover That Is the Wrong Size
A cover that is the wrong size will not go on correctly regardless of technique. A cover one inch too small will be extremely difficult to pull over the tire and may tear during forced installation. A cover two or more inches too large will sag and shift no matter how tightly the drawcord is pulled. Correct sizing is the foundation of a correct installation.
→ Check the size guide before ordering →
Mistake 4 — Putting On the Cover Over a Flat Tire
A spare tire that is significantly underinflated measures smaller in diameter than when properly inflated. A cover that fits a deflated spare will be too tight once the tire is brought to proper pressure. Always inflate to the recommended PSI before putting on the cover.
Mistake 5 — Not Securing the Drawcord Ends
Leaving the drawcord ends loose and dangling allows them to gradually loosen during driving. Tie a secure knot or tuck the ends into the drawcord channel so they cannot vibrate free over time.
How to Take Off a Spare Tire Cover Quickly
Taking the cover off is faster than putting it on:
- Loosen the drawcord completely — fully undo the knot and release all tension
- Pull the cover off evenly from the bottom upward, working both sides simultaneously
- For emergency roadside removal, the entire process takes under 60 seconds
- If storing the cover after removal, shake off debris and let it air dry before folding
Never try to pull the cover off without first loosening the drawcord. The tension makes removal difficult and risks tearing the drawcord channel.
Frequently Asked Questions About Putting On a Spare Tire Cover
Can I Put On a Spare Tire Cover Without Removing the Tire?
Yes — this is the normal method. You do not need to remove the spare tire from the vehicle. Simply pull the cover over the tire while it is mounted on the rear tailgate or wherever it sits on your vehicle. The cover is designed to be put on and taken off with the tire in its mounted position.
Why Does My Cover Keep Sliding After I Put It On?
A cover that slides or rotates after installation almost always indicates an insufficiently tightened drawcord. Loosen the cover, reposition it centered on the tire, and re-tighten the drawcord more firmly than before. If the cover continues to slide even with the drawcord fully tightened, the cover may be one size too large for your tire.
My Cover Was Difficult to Put On — Is It the Wrong Size?
Difficult installation can indicate the cover is one size too small. However, if the cover is new and the tire has aggressive tread or a wide profile, some resistance during the initial installation is normal — the fabric is stiff until it has been worked onto the tire a few times. If the cover absolutely will not go on despite reasonable effort, stop — forcing an undersized cover risks tearing the fabric. Check your tire diameter and confirm you ordered the correct size.
How Do I Know I Have Put the Cover On Correctly?
A correctly installed cover sits flush and flat against the tire face with no wrinkles or loose sections, the design is centered and straight, the bottom edge is even all the way around, the drawcord is tight with no slack, and — if applicable — the camera hole aligns clearly with the lens. If all five of these conditions are met, the installation is correct.
Can I Put On a Spare Tire Cover in Cold Weather?
Yes, but the fabric will be stiffer in cold temperatures. If you find the cover difficult to stretch over the tire in cold weather, bring the cover indoors for 15–20 minutes before installation to let it warm up slightly. The polyester becomes more pliable at room temperature and will go on much more easily.
Where This Fits in the Complete Spare Tire Cover Guide
Knowing how to put on a spare tire cover correctly is the first step — but getting years of performance from your cover also requires knowing how to clean it properly, how to maintain it between uses, and when it is time to replace it. All of these topics are covered in detail in the complete guide below.
👉 How to Install and Maintain a Spare Tire Cover — Complete Guide
For tire pressure specifications and vehicle safety standards, refer to the NHTSA tire safety guidelines — the official U.S. government resource for tire maintenance and vehicle safety.
Ready to get the right cover for your spare tire? Browse our full collection of custom spare tire covers, available in sizes 27″–35″ for Jeep, SUV, RV, and trailer owners.